

Complete Guide to Setting Up a Hydroponic Grow Tent in Australia
By Hydro Experts | 10 March 2025
.jpg)
Hydroponic growing is gaining serious traction in Australia, and for good reason. Whether you're tight on space, looking to maximize yield, or simply want to control every aspect of your plant’s growth, a hydroponic grow tent is your best bet. But setting one up properly—from seed to harvest—requires the right approach, especially given Australia's unique climate challenges.
This guide will walk you through every step of the process, covering budget-friendly setups, high-end professional options, and everything in between. Whether you're a newbie or a seasoned grower, let’s get your hydroponic system running like a well-oiled machine.
Step 1: Choosing Your Grow Tent
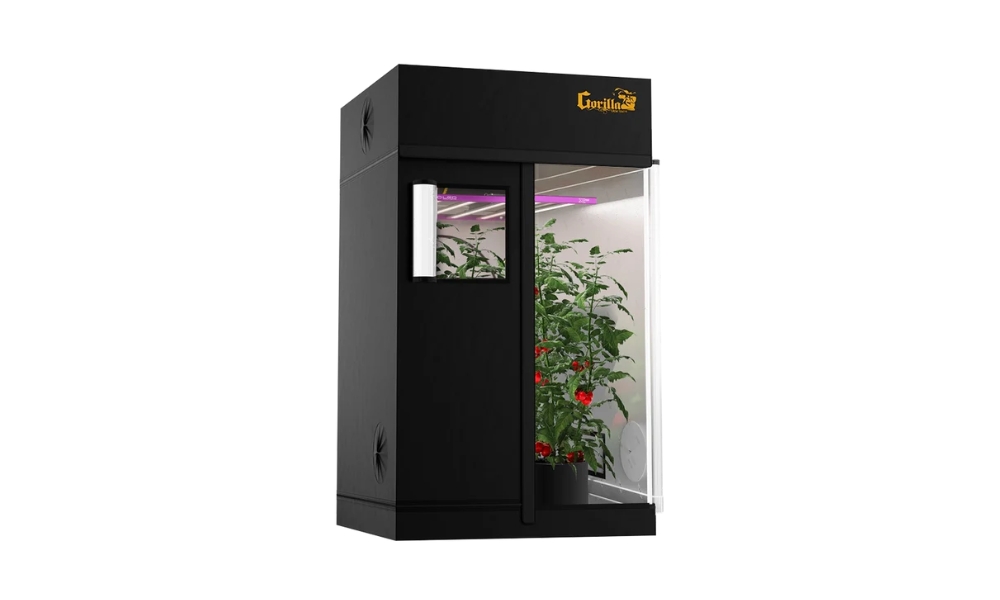
A grow tent is essentially a portable indoor greenhouse. It provides the controlled environment your plants need by managing light, temperature, and humidity. When selecting a grow tent setup, consider the following:
- Size: How much space do you have? Common sizes range from 60x60cm for a small herb setup to 120x240cm for larger operations. Make sure your tent fits your available indoor space while allowing proper ventilation and ease of maintenance.
- Material: Look for high-quality Mylar lining (which reflects light efficiently) and sturdy metal frames. Double-stitched fabric will ensure durability and prevent light leaks.
- Ventilation Ports: Ensure the tent has proper ports for ducting, fans, and power cables, which makes setting up your climate control system much easier.
- Budget: Prices range from $80 for small tents to $500+ for commercial-grade ones, with mid-range options offering the best value for hobbyists.
- Height of the tent: Certain tents, like Gorilla Grow tents, can be raised or lowered. 2M is the typical size. Similarly, some of them are 2.3 or 2.4 meters.
Heat buildup is a real issue in Australia. Opt for a grow tent with multiple ventilation options, especially if you’re growing in a warmer climate.
Step 2: Lighting – Choosing the Right Grow Lights
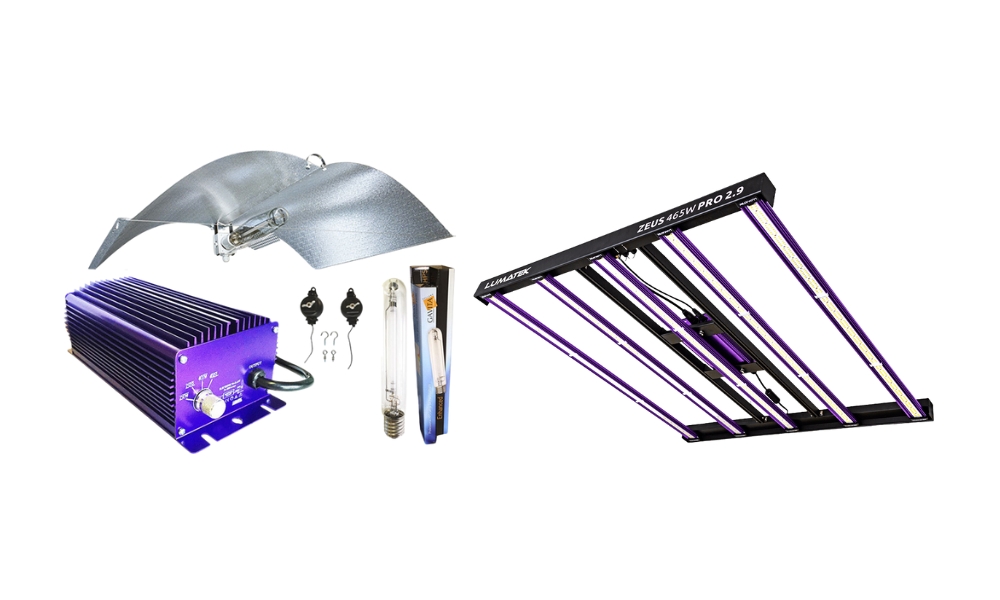
Since natural sunlight isn’t an option inside a grow tent, grow lights are essential. There are three main types, each suited to different needs and budgets:
- LEDs: Energy-efficient, long-lasting, and low heat output. Best for all plant stages, especially in small to midsize setups. While initially expensive, they consume less power and last longer, making them cost-effective in the long run.
- HID (HPS & MH): High-intensity lights are great for large-scale operations but produce more heat. High-Pressure Sodium (HPS) lights are ideal for flowering, while Metal Halide (MH) lights work well for vegetative growth.
- Fluorescent (T5): Best for seedlings and clones but weak for flowering plants. These lights are more suited for early-stage plant growth due to their lower intensity.
Since electricity costs are high, LEDs are the best long-term investment. Look for full-spectrum LEDs that cover all growth stages.
Step 3: Setting Up Ventilation & Climate Control

Temperature and humidity control inside a grow tent setup is crucial for healthy plants. Here’s what you need:
- Exhaust Fan: Removes hot, stale air. Choose one with a carbon filter to eliminate odors and prevent mold buildup.
- Oscillating Fan: Ensures airflow inside the grow tent setup, preventing stagnant air pockets and improving CO2 distribution.
- Humidifier/Dehumidifier: Helps maintain the right humidity (40-70% depending on plant stage). Tropical plants require higher humidity, while fruiting plants prefer drier conditions.
- Air Conditioner or Heater: For extreme temperatures, especially in regions experiencing harsh seasonal shifts.
- Thermometer & Hygrometer: Monitors temperature and humidity levels, allowing for fine adjustments.
In humid regions like Queensland, a dehumidifier is essential. In drier areas, misting or a humidifier might be needed to keep plants from drying out.
Step 4: Picking the Right Hydroponic System
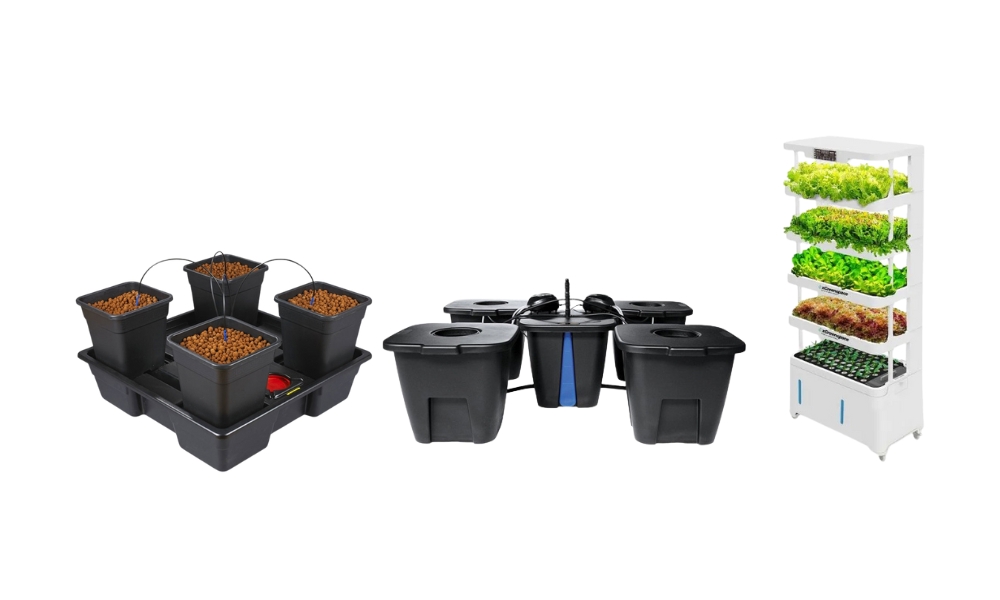
There are multiple hydroponic methods, and your choice depends on what you're growing, your experience level, and how much time you’re willing to invest in maintenance.
- Coco Coir & Soil (most common): The simplest way to get started is with coco coir and soil and a basic drip watering system. It provides the comfort of conventional soil gardening with improved fertilizers and irrigation management.
- Deep Water Culture (DWC): Best for leafy greens and herbs; roots sit in oxygenated water. This system is simple, making it great for beginners.
- Nutrient Film Technique (NFT): Ideal for lightweight plants like lettuce and basil; a thin film of nutrient solution continuously flows over the roots, ensuring constant feeding and hydration.
- Ebb & Flow (Flood & Drain): This is Suitable for larger plants like tomatoes and strawberries. It periodically floods the grow tray with nutrient solution and then drains it back, allowing roots to absorb nutrients efficiently.
- Drip System: This is more precise and scalable, good for both small and large setups. Drip irrigation can be adjusted to deliver just the right amount of nutrients directly to the roots.
- Aeroponics: This is High-tech and efficient, but it requires careful monitoring. In this system, plant roots are suspended in air and misted with a nutrient solution, promoting rapid growth and oxygen absorption.
In hotter regions, NFT and aeroponics may struggle due to water temperature fluctuations. DWC with a chiller is a solid option to keep your nutrient solution at an optimal temperature.
Step 5: Nutrients & Watering System
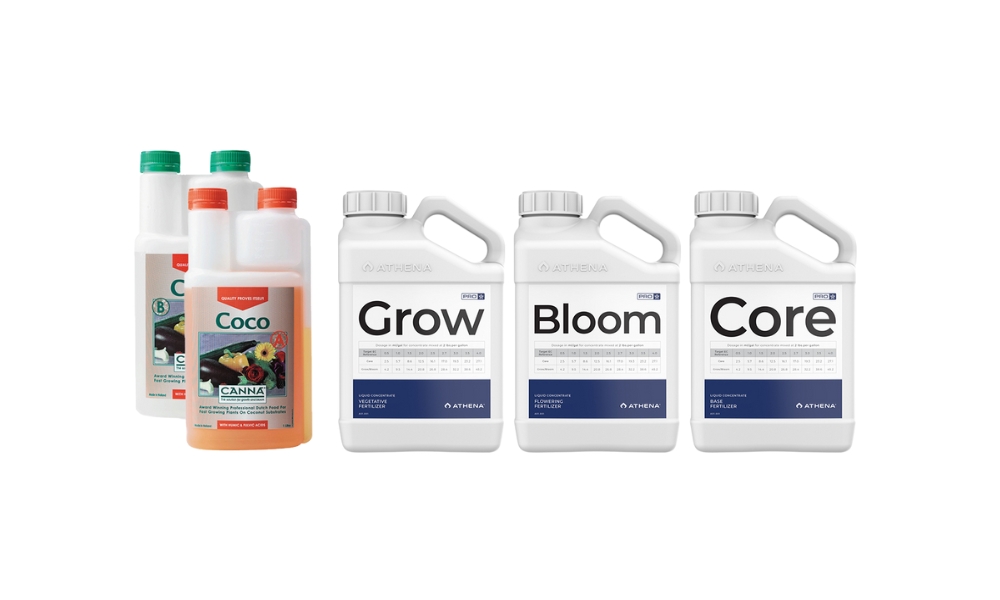
Since hydroponics relies on water rather than soil, providing the right nutrients is key. Tap water quality varies. Likewise, check for high chlorine levels and use a filter if needed. Rainwater collection is a great option for a natural water source.
- Macronutrients: Nitrogen (N), Phosphorus (P), and Potassium (K) are the big three, supporting growth, root development, and flowering.
- Micronutrients: Calcium, Magnesium, Iron, and others support plant functions, preventing nutrient deficiencies.
- pH Control: Hydroponic plants thrive in a pH range of 5.5-6.5. Invest in a pH testing kit and adjust with pH up/down solutions.
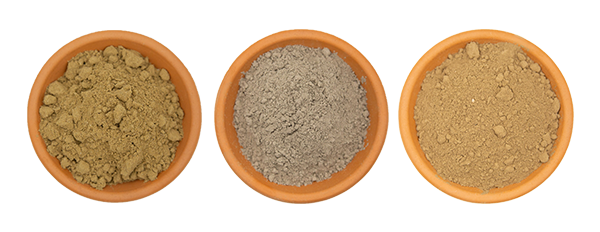
Step 6: Choosing the Right Growing Medium
.jpg)
Unlike soil, hydroponics uses inert growing media to support root systems. Some popular choices include:
- Coco Coir: Retains moisture well, great for beginners and widely available in Australia.
- Clay Pellets (Hydroton): Excellent aeration, reusable, and ideal for ebb and flow systems.
- Rockwool: Holds water well but needs proper pH adjustment before use.
- Perlite & Vermiculite: Used in mixes for aeration and water retention.
It is important to note that Coconut coir is eco-friendly and commonly found in garden stores across Australia.
Where to Buy Quality Hydroponic Gear in Australia
If you're looking for a trusted supplier for all your hydroponic needs, Hydroexperts is a fantastic option. They offer a wide range of products, from beginner-friendly kits to high-end professional setups. Whether you need LED grow lights, nutrient solutions, ventilation systems, or complete hydroponic systems, they’ve got you covered. Check out their full range here: Hydro Experts.
One of the best things about Hydroexperts is their commitment to quality and fast shipping across Australia. Moreover, they have excellent customer support and regularly update their stock with the latest hydroponic innovations. Whether you're setting up your first grow tent or optimizing an existing one, Hydroexperts provides reliable gear that helps you get the most out of your plants. Take a look at their latest deals and grow smarter with top-tier hydroponic equipment.+
Final Thoughts
Setting up a hydroponic grow tent in Australia isn’t just about getting the right gear—it’s about understanding the climate, water quality, and electricity costs unique to the region. But once you’ve got the setup dialed in, the rewards are massive: faster growth, higher yields, and the satisfaction of homegrown produce.
Whether you're going budget DIY or investing in a top-tier system, the key is consistent monitoring and adjustments. Ready to get growing? Your hydroponic journey starts now!
FAQs
For absolute beginners, Coco Coir & Soil with a simple drip irrigation system is the easiest way to start. It offers the familiarity of traditional soil growing but with better control over nutrients and watering. Coco coir is forgiving, provides excellent aeration, and retains moisture well, reducing the risk of overwatering or nutrient imbalances.
Heat management is crucial in Australia. To keep temperatures in check:
- Use LED grow lights instead of HPS to reduce heat output.
- Install an exhaust fan with a carbon filter to remove hot air.
- Keep a thermometer and hygrometer inside to monitor conditions.
- Consider a portable air conditioner or intake fan in extreme heat conditions.
For most setups, full-spectrum LED grow lights are the best option. They are energy-efficient, produce less heat, and provide the necessary light spectrum for both vegetative and flowering stages. HID (HPS & MH) lights work well but generate a lot of heat and consume more power. Example, Lumatek LTD.
You should completely change your nutrient solution every 1-2 weeks, depending on plant growth and water consumption. Regular top-ups with fresh water are necessary to maintain nutrient balance. Always check pH (5.5-6.5) and EC (electrical conductivity) levels to ensure proper feeding.
Hydro Experts is a trusted supplier with a vast selection of hydroponic grow tents, lighting, ventilation, and nutrient solutions. They offer fast shipping across Australia and excellent customer support. Check out their products here: Hydro Experts.
Related Products
EXPERT'S CHOICE

Lumatek LED Grow Light ZEUS 600W PRO 3.1 - 600W | 3.1 umol/J | Dimmable | IP65
EXPERT'S CHOICE

Green Planet Professional Coco Perlite 70/30 - 53L Bag | 70% Buffered Coco + 30% Perlite


EXPERT'S CHOICE

EXPERT'S CHOICE
